


Round One Voting

You still have time to enter the Play at Home Giveaway for a chance to win your own Glittery Vinyl from Cricut! After you see these awesome projects, you are going to want some, I promise!
The time has finally come for our first round of voting! Are you so excited?!?! I know I am. I am just blown away by the creativity that our contestants have shown through their projects. All of the contestants were asked to send in two photos and a quick write up about their project that I will post here for you to see. At the end of this post you will find the voting. You are allowed to vote for your top 3 favorite projects so keep that in mind as you look at all the projects.
Just so that you are aware, Leisha from Homemade Toast had to forfeit the contest due to some medical issues. We wish her a very speedy recovery and send our love. Due to her forfeit, only two other bloggers will be eliminated this round for a total of three so that we can continue on with the next round with the 9 bloggers who receive the highest amount of votes.
Let’s get on with this! Here are the projects in no particular order and submitted anonymously. (don’t forget to go vote!)
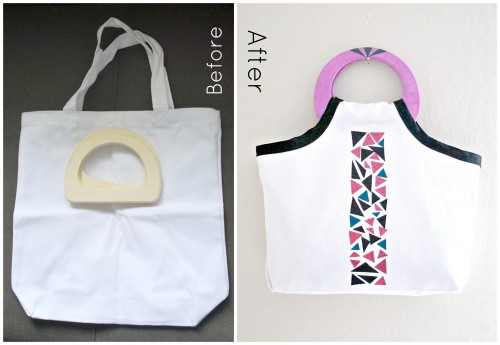
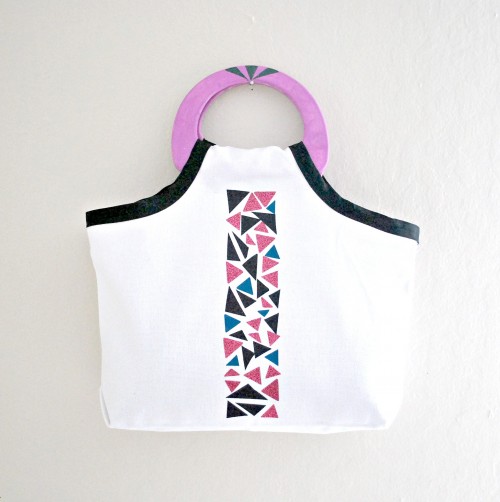
Mosaic Purse
Personalized Kids Messenger Bag

It took me about 2 seconds to figure out what I was going to make when I saw this glitter vinyl. I’d had this project idea up my sleeve anyway and had been dying to use glitter vinyl heat transfer on something. So I created a Personalized Kids Messenger Bag. Perfect for elementary school aged kids to carry their homework in or it could also be great as a dance bag or soccer bag. It could be made for boys or for girls and personalized in any fun color (and for boys you could just use regular vinyl heat transfer instead of the glittery kind). It’s got a pocket inside for pencils or gadgets and a kids size strap. I love how it turned out!!! (I’m a sucker for hot pink polkadots.)

Ants on Parade Picnic Wreath
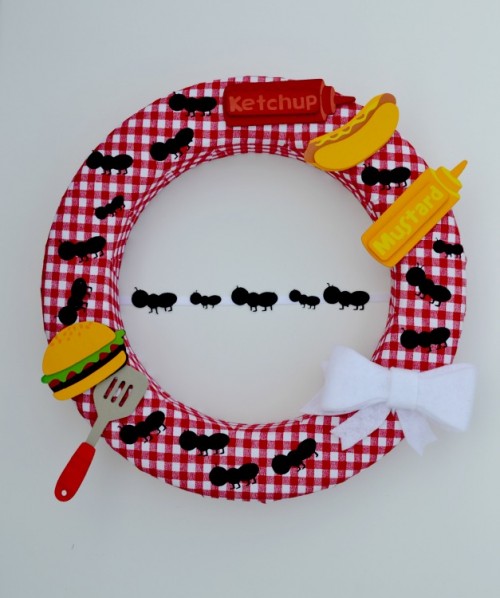
When I first got my glittery black iron on vinyl I had a hard time envisioning a spring or summer project with BLACK vinyl. I’m really into bright, fun projects right now, so I was kind of stumped for a few days. Finally it came to me and myAnts on Parade Picnic Wreath was born! I was inspired by a picnic invitation I saw online and I wanted to make a project that really stood out and that people hadn’t seen before. So I ran to the local craft store, picked up some red gingham and got started. The craft store had these great wooden props that I thought would be perfect for my wreath–I picked up a hamburger, hot dog, some mustard and ketchup bottles, and a flipper and attached them to the wreath. I then used my cutting machine to cut out little black glittery ants and I ironed them all over.

My final project touches included adding a white felt bow and adding some ants walking across the middle. It was a really fun project to make and probably one of my favorite projects to date! I think this wreath would be the perfect way to adorn your front door for your next BBQ or outdoor picnic at your house…I’d even go as far to create a tablecloth, napkins, and/or placemats with the same little ants. Or you could make your own picnic blanket in the same style! See black, white and red can be springy too! I hope you enjoy my wreath as much as I do–I think it’s pretty one of a kind! Thanks so much for taking a look at my project!
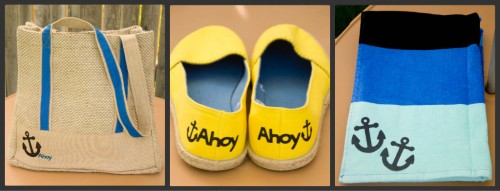
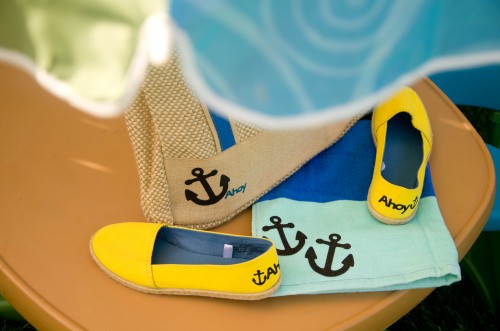
Anchor’s Away Tote Bag
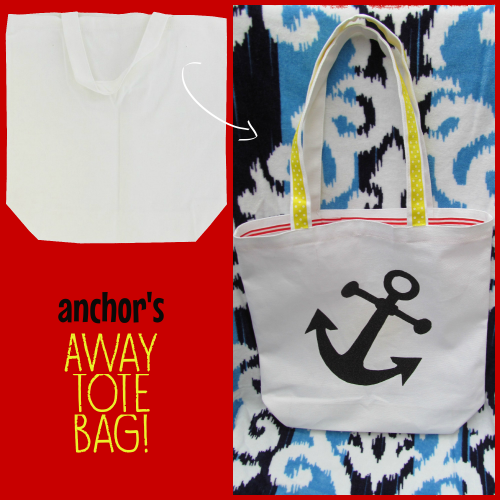
Do you have plans to hit to the pool or head to the local growers market this summer? Are you going to be celebrating graduations or attending a baby shower? If you said yes to any of these, then I have the perfect project for you! Whether you keep it for yourself or give it as a gift, my cute Anchor’s Away Tote Bag is easy to make, easy to personalize, and can be used again and again! All you need is Provo Craft glittery iron-on vinyl, a canvas tote bag, ribbon, and Heat’n Bond!
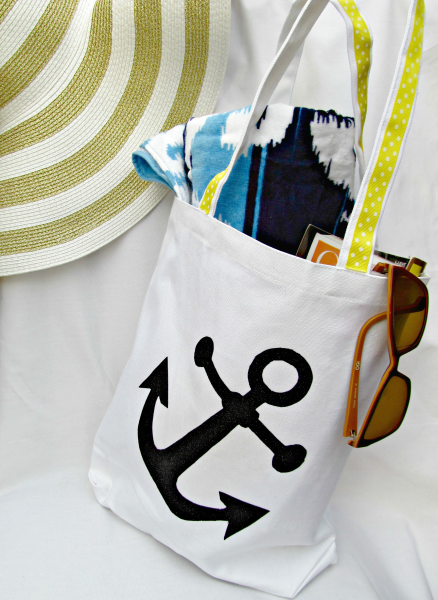
The first thing you will need to do is decide on your shape. I chose a cute anchor for the summer, but you could use a graduation cap, initial, team logo, stripes, stars… the ideas are endless! For my bag, I used this anchor shape and printed it on card stock. You will want to use card stock because after you {carefully} cut out your shape it will be thick enough to give you an edge to follow when you cut out the vinyl. Using an Xacto knife, I cut my anchor out of the vinyl. Then, following the instructions, I ironed the anchor onto my bag! *Tip: The clear liner faces up towards you. If it faces down, after you iron it, your anchor will be adhered to your cloth! (I learned the hard way!)* The last step is to iron the Heat’n Bond to the back of both the ribbons for the handles and the ribbon for the inside edge. After ironing the ribbons onto the bag, step back and admire your new cute tote bag; I know I love mine!
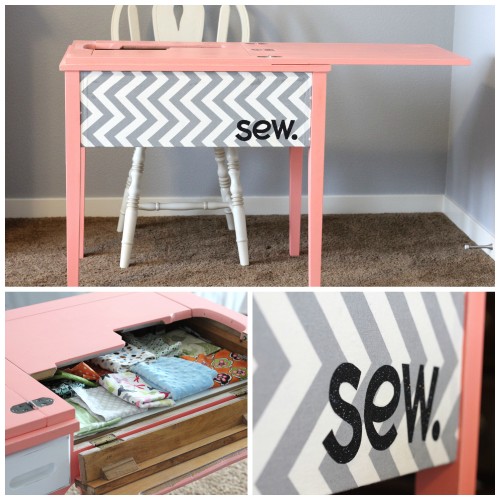
Sewing Table Redo
When I first opened the box and saw the Cricut Iron-on I had a moment of panic. I do not have a Cricut or other fancy cutting machine. I do have one nice pair of scissors and an exacto knife. When I can find it. But since I have the scissoring skills of an angry third grader I knew I wasn’t going to be able to do an intricate design. As I was brainstorming I looked around my house and saw an old sewing table that my neighbor gave me about six months ago. I had been thinking of painting it, staining it, trashing it (?), but had done nothing so it sat in the corner collecting dust and preschool projects. Light bulb. So I sanded it, primed it, sanded again, painted, sanded some more (what?) and then added fabric to the front using Mod Podge.
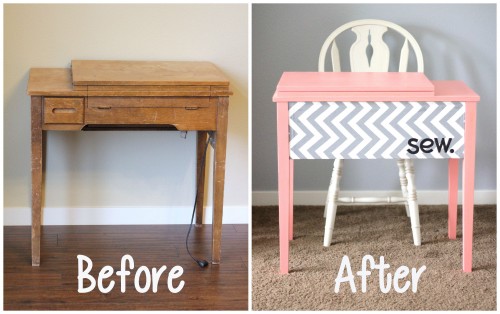
I discovered through this process that the 70s style sewing machine that this table was made for was a far different shape than my machine. It would have never fit. So in the future I’ll just put my machine on top of the table when I’m sewing and use the inside to store fabric scraps. I took out some of the hardware inside then sanded and painted the wood to give myself a nice little shelf for storage. I may change the function of this shelf when I have a chance to really use the table. Finally, for the perfect touch of bling? The glittery iron-on film which I ironed on to my fabric before Mod Podging it to the front of the table. I printed off “sew.” from my computer, cut the letters out of paper, traced them onto the film, and then cut them out with scissors. In retrospect I probably should have written “sew what?” since it represents my general attitude towards sewing and my disregard for half the instructions that come with every project. I’m sort of a rebel. A rebel who likes puns and has crookedly sewn curtains.
Elephant Shirt

I was so excited when I opened up the package from Provo Craft and saw the iron on vinyl as the secret ingredient for this round and I could not wait to get started. I have actually had a roll of iron on vinyl for like a year just sitting on my craft shelf, because I was so nervous to try it out. I am so glad this gave me the push to finally make something with this awesome product. Seriously the possibilities are endless. It really wasn’t scary at all. I had one little hiccup cutting some of the elephants the wrong way, but then it ended up being just what I wanted in the end. You know one of those craft projects that turned out better than you even had in your head. I love those. And I love how this shirt turned out.

My very first thought was to make a shirt so I just went with it. I have been in love with the tribal animals, the arrows, triangles and aztec prints that are floating all around the fashion world right now, so I thought why not make my very own one of a kinda Tee with those styles I love. I got the white shirt at target for only $12. I cut the glitter black vinyl into elephant shapes with my cricut {You could also cut the vinyl by hand} and then I used the pre- cut triangles that Provo Craft sent. Next I laid it out and designed it how I thought it looked best. Followed the instructions and ironed it right on! It really was a quick, easy and fun project. I know you will love trying out the iron on vinyl and making your own. Seriously isn’t it the cutest shirt you have ever seen. Who doesn’t love elephants?! I am excited to pair it with some fun pants or printed leggins. Go bold or go home I say!
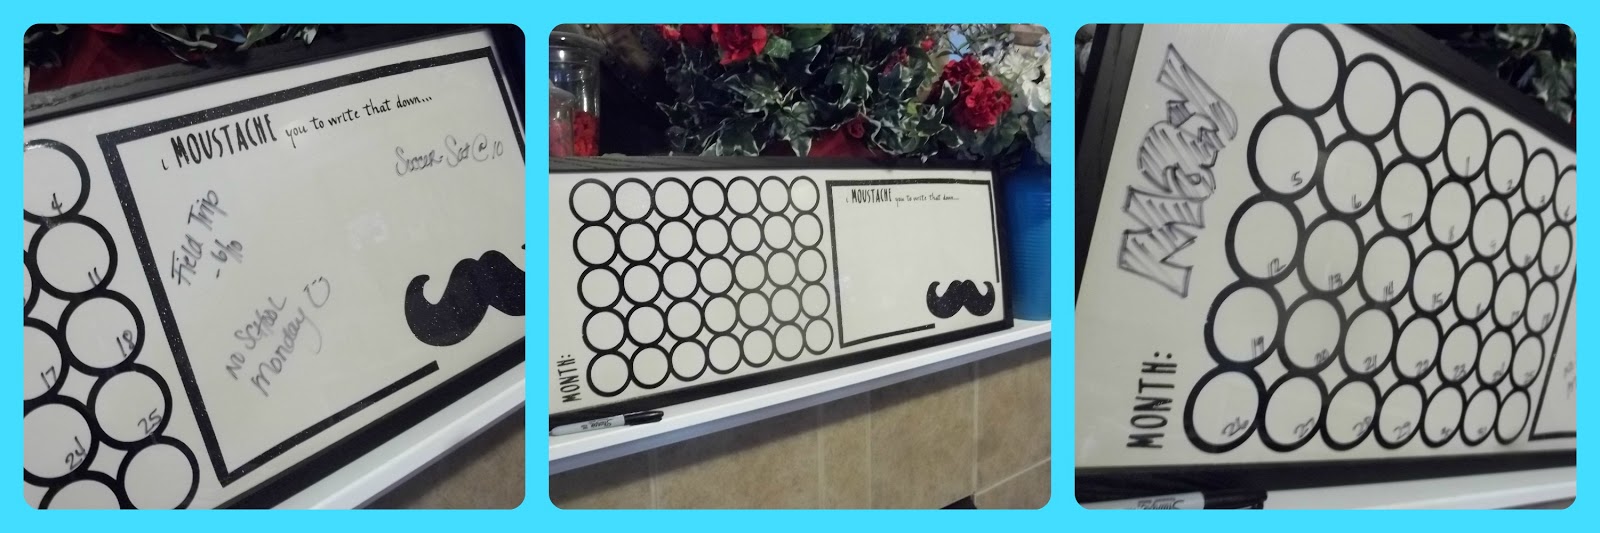
Dry Erase Calendar & Memo Board

A Day at the Beach
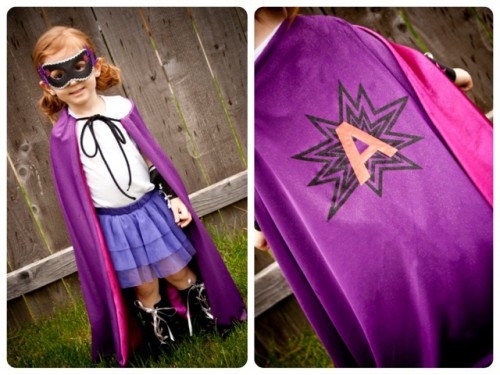
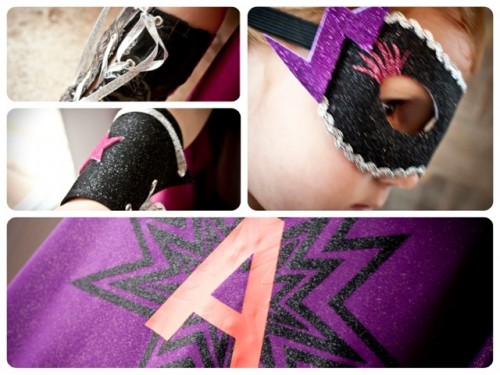
Super Hero Costume
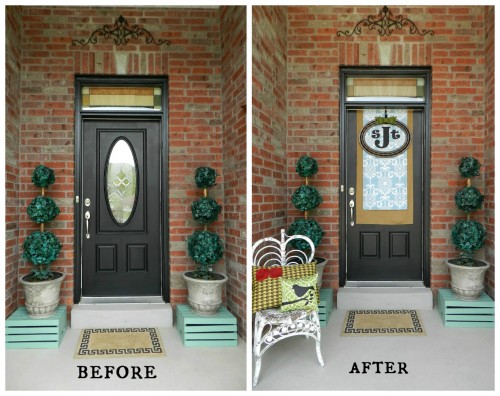
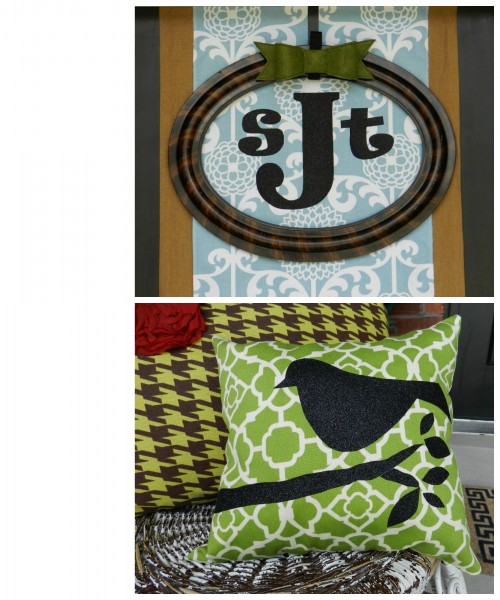
Monogrammed Door & Bird Silhouette Pillow
Brave Inspired Arrow Pouch
![]()
My three year old daughter is currently *obsessed* with all things Brave and Merida related. She’s started quoting her favorite parts from the movie and has even recently acquired her very own Merida Bow and (suction cup) Arrow set. She’s over the moon about it! The only downfall we’ve faced is that while she’s mimicking Merida riding her horse at the beginning of the movie, she can’t hold her horse, her bow, and her arrows all at the same time and it’s become quite the issue. Like, we’re talking meltdowns here.
![]()
When I received the iron-on vinyl from Cricut this week, I knew exactly what I needed to do; I created my daughter her very own Brave-Inspired Arrow Pouch! I know technically it’s supposed to be called a quiver, but the three-year-old dictated what it should be called and I’m letting it slide. I kept my daughter in mind when putting this together, so it’s adorned with ruffles and the trendy triangle iron-ons, but I also made the strap as two separate pieces with hook and loop tape for safety reasons. This way it can easily detach should she get stuck on something. We’re both in love!
Aren’t these projects all incredible?!? Now it’s your turn. Vote for your top THREE favorite projects. You will have until Sunday at midnight to vote and the results will be posted on Monday. Good Luck to all the contestants!

Voted – but man it was hard to choose! Love all of the projects! Great job everyone!
wow! what neat projects… that sewing table refurb was ahhh-mazing. I was given an old sewing table and have been wondering what to make of it. well, now I have a few ideas…
So many awesome projects!
Love this contest! lots of cute things!
HOLY MOLY! The TALENT!!! It was so hard to only pick three!!!
They were all pretty good, but I really enjoyed the ones that are a newer idea and not already done many times before. My fav tho is hands down the Brave Inspired arrow holder!
There are waaaaaay too many cute things! This is torture but fun!
It seems unfair to have pictures of people’s kids and the front of their house in their entries…anyone who knows them will know which project is theirs and vote for them. Doesn’t give the others as much of a shot.
I was thinking the SAME exact thing. Anyone who has a strong readership can pretty much tell.
Casey, Thanks for taking the time to give me your feedback. I will be changing some things so that it doesn’t happen for the second round.
Kelsey, I appreciate your feedback. I am afraid that I wasn’t clear enough with the contestants from the beginning, so I will be making things more clear for the second round. Thank you for taking the time to comment!
Woweeee! Such creativity among the bloggers!
Now I’m really anxious to see who will win, even though they’re ALL winners to me!
I agree with Kelsey and Casey.. Such cute projects!! To put the kids in there just sort of took away from the whole objective.
I appreciate your feedback and will definitely be making some changes for the next round. Thanks for your comment!
Wow! Was it ever hard to choose only three! Great designs and ideas, what fun! Everyone is a winner!
So fun!!! Love all the projects here. Just voted, it wasn’t easy to just pick one 🙂 Good Luck everyone.
Very creative projects but I had 3 favorites the personalized kids messenger bag, the cute BBQ wreath and the monogrammed door and bird. It was so hard to choose just one!
All great! Hard to vote but I finally did!
Thanks
Just voted! Great projects!! Fun ideas!
Wow, super tough to choose just one to vote for! Amazing projects!
Holy wow, was that ever hard to choose! SO many great ideas! 🙂
Love how varied the end results were! What creative crafters you all are with what was given. The thing I liked about the mosaic purse was how much the tote was manipulated to look not like a boring, square bag (and clever use of the mosaic triangles). I’ll have to stuff that trick away in my crafting archives for later 😉