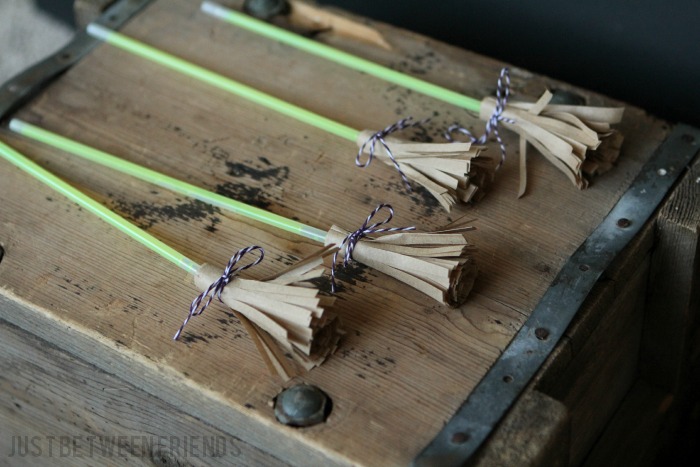
Glow in the Dark Broomsticks
My daughter has a summer birthday, so it is always a toss up as to when they will actually celebrate her at the school. Usually it is in the spring time or towards the end of the school year. This year, her teacher decided to celebrate in the fall. Do you know how excited we both were that we got to come up with a spooky birthday treat to give to all of her classmates?! We brainstormed together and eventually, this is what we came up with. Glow in the Dark Broomsticks! It is the perfect gift for classes because you don’t have to worry about food allergies, and they are really inexpensive to make.
To make your own, you will need a few things. It took some tracking to get everything I was looking for, but luckily I have all of that info for you now 🙂 You will need glow sticks. The cheapest and best place to buy them is hands down the dollar store. They sell them in tubes of 20 of the same color, or you can pick up the assorted colors. I thought it would be best to make them all the same so that there isn’t any fighting over favorite colors. You will also need paper lunch sacks, twine, cellophane bags, ribbon, and some candy corn.
To make the broom part, cut the lunch sack into three parts. Then stack them together and cut vertical strips all along the bottom 3/4. Grab your glow stick, add a connector so that they glow stick can be used as a bracelet, and then wrap the cut lunch bag around the glow stick very carefully so you don’t accidentally activate the glow stick by breaking it. Last, tie it up with the bakers twine and you are good to go! I recommend tying a double knot to secure it first, and then tie a bow for the cute factor. We all know the cute factor is important! Ha!
I chose to use cellophane bags (I picked them up at Zurchers, 25 for $3) because I thought they would be the best way to display the brooms. They worked out great. The ribbon closing the sack really holds the broom in place making them easy to pass out to the kids in the class. As an added treat, I chose to put some candy corn in the bottom of the sack. I picked up the candy corn at Target, 2 bags for $4.
To finish off the whole look, I needed a tag. I designed these fun Happy Birthday tags for Lillie and let her tell me the colors that she wanted to use. Then I printed them off, punched a hole in the top corner and added them to the packaging. I think they are the perfect little finishing touch. Come back tomorrow and I will give you the free printable for these tags, plus show you how to customize it to have any name you want! I will also have some Happy Halloween versions to share.


Simple, but darling! Love!
These are adorable Jonie! I love them. They would be great for classmate Halloween treats or to even hand out at Halloween too! So cute!
These are so cute! I love this idea!
This is adorable! Thanks for sharing, I host a family Halloween party & this is definitely going to go in the little treat/gift bag. So cute.
So cute! I love how easy they are for kids to help with, too!
I love this idea! These are so simple and so cute!
Okay, these are so fun! Pinning
These are so cute! I bet they would be fun for kids to make at a classroom Halloween party too!
These are so cute!! My kids would love them. What a fun trunk or treat idea, before the kids go trick or treating in the dark!
These are adorable!. I think my grand kids would really enjoy these cute little brooms and treats.